Wednesday, October 30, 2013

Mark Your Calendar!

Yes, it's that time of year again!  Please mark your calendar and join me on Wednesday, November 13th for my segment of the Quiltmaker's 100 Blocks blog tour.  It's always a lot of fun...and there will be giveaways!

Until next time...please visit the Curlicue Creations Shop...and have a super day!

Get Creative!

Jennifer Schifano Thomas

Tuesday, October 22, 2013

Show, Shine, Shag & Dine 2013


The small town I live in has a big car show every year.  They close the main downtown road, and out come the cars.  I try to attend every year.  It's fun, and the colors and styles of the classic cars usually leave me feeling inspired to transfer the colors and designs into my quilting.


At one end of the street, all the drag racers are on display.  They like to rev up the engines every now and then. 


Trent thought they were too loud.
He was there to see the Corbitt trucks.  I didn't get any pictures of those.  I was too busy enjoying his reaction to seeing the big, classic trucks, originally manufactured here in Henderson, North Carolina, mainly during the early 1900's.


The drag racers are fun to look at.  This is just after we stopped and bought some delicious barbecue sandwiches from the Boy Scouts.  They did a nice presentation of the colors at noon.


I loved the under the hood paint job on this car.
Beautiful.  It made me wish I were at the beach.


Here's one of the more outrageous cars that was on display.  It has a jet engine.


Pretty paint job on this car.  I love that shade of green.

I hope you were a little bit inspired by this trip down the street in my small town.

Until next time...please visit the Curlicue Creations Shop...and have a super day!

Get Creative!

Jennifer Schifano Thomas

Monday, October 21, 2013

Sunday Stitching


That was one exciting game between the Carolina Panthers and the Rams yesterday!  I didn't get much accomplished on my next block, Scalloped Tulip Wreath, but here it is, so far.  I did the main part of the "scallop" - that was fun!  And a few small leaves.  These go in a circle and are topped with a large flower.  There will be more leaves and some tulips around the outside of the scallop.  Stay tuned!  This is another block from Jane Townswick's book, Artful Album Quilts.

Until next time...please visit the Curlicue Creations Shop...and have a super day!

Get Creative!

Jennifer Schifano Thomas


Friday, October 18, 2013

Free Craftsy Quilting Classes


Need I say more?

Until next time...please visit the Curlicue Creations Shop...and have a super day!

Get Creative!

Jennifer Schifano Thomas 

Tuesday, October 15, 2013

Spring Tulips Block Progression

This past Sunday afternoon, while watching the Panthers win - Yay!  I finished stitching the Spring Tulips block.  Here's the block progression.


I started out with some stems, lots of leaves, and a few cutie leaves with a little bit of cut work/reverse applique in the centers.


Next, I added that pale yellow tulip, a bud, and the two blue birdies, flitting about.  Plus more leaves, of course.  All of these blocks have a lot of leaves.


And I finished here, with the rest of the tulips, and the little mound of dirt they are sprouting from.
Hooray!  Another block complete.  Again, I'm sewing these from Jane Townswick's book, Artful Album Applique.  On to the next block!

Until next time...please visit the Curlicue Creations Shop...and have a super day!

Get Creative!

Jennifer Schifano Thomas


Wednesday, October 9, 2013

New Craftsy Class - Vintage Dress!


Oh my!  Is this adorable, or what????  I know a lot of my readers are not only quilters, but vintage fans, too, so I couldn't wait to share this new Craftsy class with you!  I'm adding it to my wishlist. I want to take this class!

Here's a link to the class preview.  I know you'll want to take a peek!

                             Vintage Sewing: The Flirty Day Dress with Laura Nash

Until next time...please visit the Curlicue Creations Shop...and have a super day!

Get Creative!

Jennifer Schifano Thomas

Tuesday, October 8, 2013

The Blue and Yellow Star Quilt is Quilted!


I finished quilting the Blue and Yellow Star Quilt this week.  Here's a corner view.


I did a lot of feather quilting practice on this quilt.  I quilted an allover meandering feather with an echo on one side of each feather.


It was fun, and good practice, too.


Here's a clothesline photo of the whole quilt.  I still need to trim the batting and backing.

                                     Online Quilting Class

I finally learned how to feather quilt by taking a Craftsy class.  I'm taking Free Motion Quilting with Feathers by Angela Walters.  Click the above icon to go directly to Craftsy quilting classes.  They have so much to offer, even some free classes!


Click the above icon to nominate Curlicue Creations for the 2013 Craftsy Blogger Awards.
Thanks!

Until next time...please visit the Curlicue Creations Shop...and have a super day!

Get Creative!

Jennifer Schifano Thomas

Tuesday, October 1, 2013

Star Quilt Block of the Month Tutorial #3 - Shadow Star

Hello!  Thanks so much for joining me for the third installment of the Star Quilt Block of the Month Tutorial series.  I'm really excited about this month's block, Shadow Star.  


The Shadow Star block features a Log Cabin style center, and it doesn't stop there.  The block is divided diagonally into a light half and a shadow half.  This means you can use this block in any Log Cabin style setting!


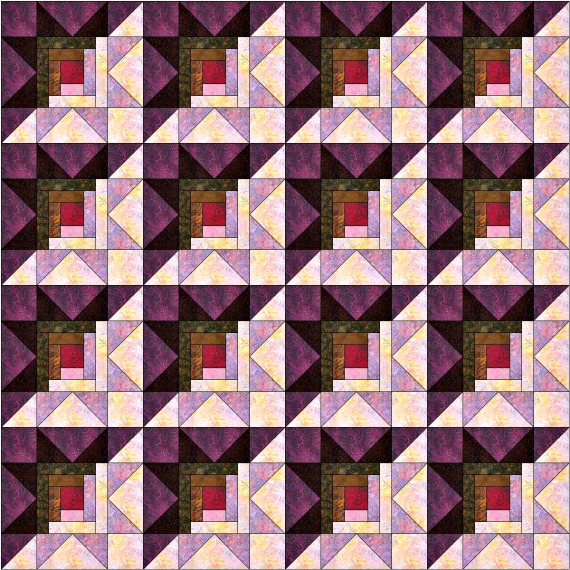
Here's just a few examples.  Above, a Log Cabin Star quilt.


A simple, but effective quilt setting.


Alternating Bars/Furrows setting.


Zig Zag/Chevron setting.

Inspired yet?  Let's learn how to sew the Shadow Star Block.


I used nine different fabrics for this block.  It is important to get a good contrast between darks and lights when choosing your fabrics.  This is what I used, Dark Purple, Light Pink, Lilac, Darkest Brown, Dark Brown, Medium Brown, Medium Brown #2, Rose Pink, and Red Wine.  This block will be 12-1/2" and features all 1/4" seam allowances.


Cutting:
   Purple:  Cut 1 ea. 3-1/2" square A
                          Cut 2 ea. 3-1/2" x 6-1/2" strips B
                Cut 1 ea. 3-7/8" square C
  
 Light Pink:  Cut 1 ea. 3-1/2" square A
                             Cut 2 ea. 3-1/2" x 6-1/2" strips B
                  Cut 1 ea. 3-7/8" square C
                             Cut 1 ea.  1-1/2" x 6-1/2" strip D
                            Cut 1 ea. 1-1/2" x 4-1/2" strip E

           Lilac:  Cut 4 ea. 3-1/2" squares A
                              Cut 1 ea. 1-1/2" x 4-1/2" strip E

Darkest Brown:  Cut 4 ea. 3-1/2" squares A

            Dark Brown:  Cut 2 ea. 1-1/2" x 5-1/2" strips F

        Medium Brown:  Cut 1 ea. 1-1/2" x 3-1/2" strip G 

              Rose Pink:  Cut 1 ea. 1-1/2" x 2-1/2" strip H

   Red Wine:  Cut 1 ea. 2-1/2" square I


Sewing the Block
To make the Log Cabin center we will be sewing from the center out.  Start by sewing the Rose Pink 1-1/2" x 2-1/2" strip H to one side of the Red Wine 2 1/2" square I.


Next, position the unit with the Rose Pink strip on the top and sew the Medium Brown #2, 1-1/2" x 3-1/2" strip G onto the right hand side.


Turn the unit once again, so the Medium Brown #2 strip is now in the top position and sew the Medium Brown 1-1/2" x 3-1/2" strip G to the right hand side.  (I seem to be missing that photo - sorry!)  Continue turning the block and adding the next strip to the right hand side in this manner until the Log Cabin unit is complete.  The remaining strips should be sewn on in this order:  Lilac 1-1/2" x 4-1/2"strip E.


Light Pink 1-1/2" x 4-1/2" strip E


Dark Brown 1-1/2" x 5-1/2" strip F


Dark Brown 1-1/2" x 5-1/2" strip F


Light Pink 1-1/2" x 6-1/2" strip D
The Log Cabin unit should measure 6-1/2" square.


Step 2:
Draw a diagonal line from corner to corner on the reverse side of the Lilac 3-1/2" squares A.


Lay one Lilac 3-1/2" square A on one Light Pink 3-1/2" x 6-1/2" strip B, right sides together with top, bottom, and right edges aligned.  The drawn line should run from the top left center to the lower right corner of the unit. 


Sew on the drawn line, from edge to edge.


Flip the Lilac fabric open, press, and trim away the two layers of backing fabric, leaving an approximate 1/4" seam allowance.  Save the cut away triangles for a future project.


Your unit should resemble the above photo.


Lay a second Lilac 3-1/2" square A face down on the unit, with top, bottom, and left edges aligned.  The drawn line should run from the top right center to the lower left corner of the unit.  Sew on the drawn line, from edge to edge.


Flip, press, and trim as before.  


The unit should measure 3-1/2" x 6-1/2".


Repeat to sew a total of two Lilac/Light Pink Flying Geese units.


Use the Darkest Brown 3-1/2" squares A and the Purple 3-1/2" x 6-1/2" strips B to sew two more Flying Geese units in the same manner.
 Step 3:
Draw a diagonal line from corner to corner on the reverse side of the Purple 3-7/8" square C.


Pair the Purple 3-7/8" square C right sides together with the Light Pink 3-7/8" square C.  Sew 1/4" away from the drawn line on both sides.


Cut on the drawn line.


Open out and press to make two 3-1/2" triangle square units.


Step 4:
Lay out the entire block, being careful to orient the Log Cabin Unit so the two light sides will be adjacent to the two light sides of the star points.


Sew the units into three rows.


Sew the three rows together to complete your block.

Smile!

Thanks for reading my blog today.  If you sew a Shadow Star block (or a quilt) from this tutorial, I would love to see it.

Until next time...please visit the Curlicue Creations Shop...and have a super day!

Get Creative!

Jennifer Schifano Thomas