Pages

Saturday, December 28, 2013

Must Have Quilting Books for Your Library

These two books have just been added to the Curlicue Creations Shop in the past week.  Come in and browse for a while!


This book will help you sift through your stash and choose the right fabrics to give your quilts the look you want. Everything you need to know about value, fabric selection, and how to apply the lessons to your quilt is presented in this book. Plus six quilt patterns are included to help you practice your newly acquired skills. This book also features a general quilting instruction section with all the basics, great in-depth information, and helpful, full color photos and diagrams.


This book presents everything about quilting in an alphabetical format. For example, if you want to learn about Album Quilts, look under "A". If you need some tips about Machine Piecing, check the "M" section. This book is filled with great in-depth information accompanied by helpful, full color, photos and diagrams.

Until next time....please visit the Curlicue Creations Shop...and have a super day!

Get Creative!

Jennifer Schifano Thomas

Friday, December 27, 2013

Happy Puppy!


Who doesn't love a happy puppy?  What an adorable block for Trent's 100 Blocks quilt.  Happy Puppy is block #511, from Quiltmaker's 100 Blocks, Volume 6.  This block was designed by Rob Stanphill.


Happy Puppy was quick to make, and fun to sew.  I used my fave, fusible applique with the little zig-zag edging for this block.


Here he is before the little details - poor puppy - he's blind!


Much better.  All the little details are quickly filled in using a fabric pen.  A little heat set and puppy is ready to play.  Awwwwww!

Until next time...please visit the Curlicue Creations Shop...and have a super day!

Get Creative!

Jennifer Schifano Thomas

Thursday, December 26, 2013

A Cupcake of a Block


Trent chose this block for his quilt, Cute As A Button, because of the yummy looking cupcake in the center.  He just loves sweets of any kind.  This is block #136, from Quiltmaker's 100 Blocks, Volume 2.  This block was designed by Amanda Herring.


It was a pretty involved block!  I started by cutting the background square and borders.


Next, came the cute appliqued cupcake.  Love it!


After the cupcake, I made all the little tabs.


I used a few different fabrics to make it interesting.


After all the tabs were sewn on, they had to be further attached with buttons.


You can't really tell in the photo, but the buttons are sewn in stacks of two each.  It was not easy....and very time consuming!  I love the end result, but I would not want to sew a whole quilt with this block.  That would just be too many buttons for me!


The cupcake is complete with a cherry red yo-yo.  How cute!  I just recently learned how to properly sew a yo-yo, and while it's not perfect, it's good enough for me.

Until next time...please visit the Curlicue Creations Shop...and have a super day!

Get Creative!

Jennifer Schifano Thomas

Tuesday, December 24, 2013

A Little Vintage Sewing Shopping...


Just a bit, but I love to share my treasure hunting finds with you.  Above is a small, hinged wooden box with nine, nice star blocks on the top.  More inspiration for Star Block of the Month?  Maybe!  Check back for the January Star Block of the Month tutorial on January 1st.


Another recent find is this Colt iron trivet.  I love the look of this.  I'm thinking it would look cute sanded down and painted - pink, maybe?  What do you think?  We'll see!

Until next time...please visit the Curlicue Creations Shop...and have a Merry Christmas!

Get Creative!

Jennifer Schifano Thomas

Monday, December 23, 2013

Hand-Quilting UFO's Update

Here's a couple more pics of my hand-quilting project, South Shore Road.


I'm doing simple outline quilting in the dark blue sashing for this quilt.  Here's a bit of it in progress, between the tall ship blocks.  The ships are sailing across the bottom of the quilt.


At the top of the quilt are these bright star blocks.  I'm quilting little curves in the dark gold triangles.  I'll probably just quilt in the ditch for the rest of these blocks.  I should finish these this week.  Then the skinny outer border.  I'm not sure how I'm going to quilt the border.  Any suggestions?

Until next time...please visit the Curlicue Creations Shop...and have a super day!

Get Creative!

Jennifer Schifano Thomas

Sunday, December 22, 2013

Tropical Twist Table Runner

Good morning!  (or afternoon, or evening - depending on where you are and when you are reading this!)  Here's a little peek at what I've been sewing with the Hoffman Batik Splash Collection.


After a little cutting, I made these fun, paper pieced triangle units.


The triangles were sewn together at random to make bright and scrappy squares.


Then I played with the squares until I came up with an arrangement that I like.  See the green and blue pinwheels going across the center?  Quilting up next!

Until next time...please visit the Curlicue Creations Shop...and have a super day!

Get Creative!

Jennifer Schifano Thomas

Saturday, December 21, 2013

Learn a New Quilting Skill

Three gently used quilting books have just been added to the Curlicue Creations Shop this week.  Start the New Year with one of these great books and learn something new.


This book presents twelve lessons in machine quilting, plus twelve projects to help you master your newly learned skills. This book also includes a basic quilting section, a guide to obtaining quilt supplies, and a helpful index.


This book includes a quilting introduction, quilt designs, how to get started, quilt tops, and quilting. There is a lot of in depth information accompanied by helpful, full color, step by step photos.


This book includes  designer profiles, a learning to piece section, a traditional sampler quilt, how to work with log cabin blocks, gifts to make, how to decorate with quilts, a quilt heritage section, and much, much more. This book is filled with great in-depth information accompanied by helpful, full color, step by step photos.

Until next time...please visit the Curlicue Creations Shop...and have a super day!

Get Creative!

Jennifer Schifano Thomas

Friday, December 20, 2013

Bus Stop - Another Fun Block for Trent's Quilt


The next block for Trent's 100 Blocks Quilt is Bus Stop.  It's block #696, from Quiltmaker's 100 Blocks, Volume 7.  This block is designed by Denise Starck.


Once again, there were a LOT of little pieces to cut and sew to create the school bus.  I cut them and laid them out on my design wall in the same order as the cutting directions to avoid confusion.


The bus is starting to take shape!


And ~ Voila!  Bus Stop.  Adorable!


As you can see, it goes well with the other two vehicle blocks by Denise, Rescue #1,


and Mix Master.  Mix Master appears in the current issue, Quiltmaker's 100 Blocks, Volume 8.  I still have  a few of these available in the shop, if you haven't found a copy yet.

Until next time...please visit the Curlicue Creations Shop...and have a super day!

Get Creative!

Jennifer Schifano Thomas


Thursday, December 19, 2013

Last Minute Gift! Give a Craftsy Class!


Right now you can Gift Any Craftsy Class and save big while you're doing it! Want to give someone a Craftsy class, but not sure which one to pick? With our "Gift Any Class" cards, you can buy a loved one any Craftsy class of their choosing for $30! It has never been easier to give the gift of crafting fun!

I love this idea!  Who wouldn't love to receive a Craftsy class of their choice as a gift?  By gifting a class, you are giving someone a new skill they can learn and enjoy for eternity.  Plus your friend or family member can watch their class whenever they want, as many times as they like.  Awesome!

Gift 1 Craftsy class for $30 (save up to $30)
Gift 2 Craftsy classes for $55 (save up to $65)
Gift 3 Craftsy classes for $75 (save up to $105)

Features
• Gifted classes never expire (Isn't this awesome!  It's a "forever" gift!)
• Give one, two, or three Craftsy classes
• Deliver on any date (up to three months in advance)

Giving handmade gifts? Use the super cute gift tag below from Craftsy on your gifts this year and let your friends and family know their gift was handmade with love! 
*Please note that you must register in order to print the Gift Tag below. 


Until next time...please visit the Curlicue Creations Shop...and have a super day!

Get Creative!

Jennifer Schifano Thomas

Sunday, December 15, 2013

Hoffman Bali Batiks - Hooray!


Isn't this just gorgeous?  I'm lovin' it.  It's Hoffman's new Bali Snaps Splash collection.  I'm using this to create a fun new table runner pattern for the shop.  I love the new packaging.  You can easily see each fabric in the charm pack.


Additionally, on the back of the package, each fabric is labelled for easy identification.  Perfect if you need a little bit more of one of the fabrics.


Even better, Hoffman's charms have a straight edge.  I much prefer the straight edge.  It makes for easier measuring and more accurate cutting - Hooray!

Stay tuned for the new pattern reveal, coming soon!

Until next time...please visit the Curlicue Creations Shop...and have a super day!

Get Creative!

Jennifer Schifano Thomas

Saturday, December 14, 2013

Hand Quilting U.F.O.'s


I finished knitting the Monster Cats last week, so I needed a new "TV watching" project to work on.  I went to my U.F.O. list and pulled out South Shore Road.  This quilt appeared in Quiltmaker Magazine a few years ago as a series quilt.  I love the bright colors.  I quilted all the house and tree blocks in the ditch, and then up on the shelf it went.


I got right back to work on the Lighthouse block.  I hand quilted some yellow accent lines into the lights and did the rest of it in the ditch.  Now I'm stitching some ripply waves into the water on the boat blocks.
Hopefully I will get to the finish soon!  

Until next time...please visit the Curlicue Creations Shop...and have a super day!

Get Creative!

Jennifer Schifano Thomas

Friday, December 13, 2013

Trent's 100 Blocks Quilt Update


I'm steadily sewing blocks for Trent's 100 Blocks quilt.  If you missed my earlier posts, he's choosing all the blocks from issues of Quiltmaker's 100 Blocks.  He's picking out the fabrics, too.  Here he is with Sitting Pretty, Block #410 from issue 5.  This block was designed by Kay MacKenzie.


Here's a close up of the kitty block.  Oh kitty!


And here's my design wall, with all eight of the blocks I've sewn so far.  These are fun!

Until next time...please visit the Curlicue Creations Shop...and have a super day!

Get Creative!

Jennifer Schifano Thomas

Thursday, December 12, 2013

New Quilting Books in the Curlicue Creations Shop!

Have you visited the Craft Books and Mags Section of the Curlicue Creations Shop recently?  I've been busy adding some gently used quilting books.  All of these books are in good to like new condition.  See each individual listing for details.


The variety of projects included in this book is limitless. Learn how to make projects for your home, babies, gifts and the holiday season. Create banners, place mats, baby quilts, seat cushions, jewelry bags, Christmas tree skirts and more. This book also includes a basic quilting section and a helpful index.


This book presents each block in a 4" size. Each block is accompanied with a full color photo, templates, and instructions. The block variety is endless. Projects utilizing the blocks are also included with instructions and photos. This book also includes a tips and techniques section and an index.


This book is packed with all the valuable information you'll ever need to become an expert in nearly any type of applique. Photos, tips, and detailed instructions are included to help you learn to machine applique, hand applique, curves and points, bias stems, molas, and more. This book also includes a glossary, index, and appendix.


This book is packed with all the valuable information you'll ever need to make each quilted item, adding that special touch here and there. Patterns, full color photos, diagrams, and detailed instructions are included to help you sew pillows, bags, bibs, table runners, pot holders, wall hangings, baby quilts, a tablecloth, and even seat cushions. This book also includes basic quilting instructions and full size quilting patterns.


This book is brimming with over 80 projects featuring easy time saving techniques. plus all the awe-inspiring information and handy tips you'll ever need to sew Debbie's adorable quilts for your home. Includes and Introduction, Techniques section, Pieced Projects, Appliqued Projects, and an Appendix.

Thanks so much for reading!

Until next time...please visit the Curlicue Creations Shop...and have a super day!

Get Creative!

Jennifer Schifano Thomas

Saturday, December 7, 2013

Monster Cat #2


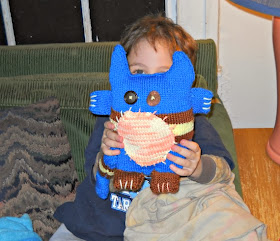
Hooray!  I finished Monster Cat #2...and I even did it before the book was due back to the library!  Here's Levi, posing in front of the Christmas tree with his Monster Cat.  Oh kitty!


Here's Monster Cat #1 again, with Trent, in case you missed that post.


If you want to knit one of these little cuties, or any of the other adorable kitties, here's the book, Knitted Cats and Kittens, by Sue Stratford.  They're all so cuddly - and the instructions were simple enough that even I could do it!  You do need some basic knitting knowledge.  The basics are not covered in this book.

Until next time...please visit the Curlicue Creations Shop...and have a super day!

Jennifer Schifano Thomas

Sunday, December 1, 2013

Star Quilt Block of the Month Tutorial #5 - Flying Star

This month's block is Flying Star.  This block was inspired by Debbie Powell of Miss Lou's Quilting Studio.  She was the spark of inspiration for this design.  I played with it and played with it and this is the end result.  


Flying Star

Remember that all blocks are 12" finished, and all seams are 1/4".  If you need to play "catch-up" the other four blocks are posted at the top of my blog, under the Star Block of the Month tab.


I used three fabrics for this block, Purple, Lilac, and Light Pink.


Cutting Instructions:

                       Purple:  Cut 8 ea. 1-1/2" squares A              Lilac:  Cut 4 ea. 1-1/2" squares A
                                    Cut 20 ea. 1-7/8" squares B                      Cut 8 ea. 1-7/8" squares B
                                    Cut 2 ea. 5-1/4" squares C                        Cut 2 ea. 5-1/4" squares C
                                    Cut 5 ea. 2-1/2" squares D                        Cut 4 ea. 1-1/2" x 2-1/2" strips E

                                                         Light Pink:  Cut 8 ea. 1-1/2" squares A
                                                                           Cut 12 ea. 1-7/8" squares B

Sewing the Flying Star Block:


Step 1:  Draw a diagonal line from corner to corner on the reverse side of all the Light Pink 1-1/2" squares A.


Lay one Light Pink 1-1/2" square A on one Lilac 1-1/2" x 2-1/2" strip E, right sides together with top, bottom, and right edges lined up.  The drawn line should run from the top left center to the lower right corner of the unit.


Sew on the drawn line, from edge to edge.


Flip the Light Pink fabric open, press, and trim away the two layers of backing fabric, leaving an approximate 1/4" seam allowance.


Your unit should look like this.


Lay a second Light Pink 1-1/2" square A face down on the unit with top, bottom and left edges lined up.  The drawn line should run from the top right center to the lower left corner of the unit.  Sew on the drawn line, from edge to edge.


Flip, press, and trim as before. 


The unit should measure 1-1/2" x 2-1/2".


Repeat to sew a total of four flying geese units.


Using the four flying geese units, the four Lilac 1-1/2" squares A, and one of the Purple 2-1/2" squares D, lay out the center square of the block.  Be careful to orient the flying geese units so they are pointing outwards.  


Sew into three rows.


Sew the rows together to form the center square unit.  This unit should measure 4-1/2" square.


Step 2:  Draw a diagonal line from corner to corner on the reverse side of all the Purple 5-1/4" squares C.


Pair them right sides together with the Lilac 5-1/4" squares C.  Sew 1/4" away from the drawn line on both sides. 


Cut on the drawn lines.


Open out, and press.


With right sides together, and opposite colors matching (Purple on Lilac, Lilac on Purple)...


again draw a diagonal line from corner to corner.  


Sew 1/4" away from the line on both sides.


Cut on the line.
\

Open out, and press.


Make four each, 4-1/2" hourglass units.


Step 3:  Draw a diagonal line from corner to corner on the reverse side of all the Purple 1-7/8" squares B.


Pair them right sides together with the eight Lilac 1-7/8" squares B and the twelve Light Pink 1-7/8" squares B.  Sew 1/4" away from the drawn line on both sides.


Cut on the drawn lines.


Open out, and press.


You should have 16 each Lilac/Purple half-square triangle units and 24 each Light Pink/Purple half-square triangle units.  Each unit should measure 1-1/2" square.


Sew the Lilac/Purple units into pairs to make eight sets.  Note the directions of the triangles.  Four sets should point right and four should point left.

'Sew one Purple 1-1/2" square to the end of four of the sets as shown above.  Be careful with the triangle direction!


Add one Light Pink/Purple half-square triangle unit to the other end of these four sets.


Next, sew the Light Pink/Purple units into pairs to make eight sets.  Again, watch the triangle directions.  Four of the sets should point to the right, four to the left.


Sew one Purple 1-1/2" square and one additional Light Pink/Purple unit to four of the sets as shown above.
Be careful with the triangle direction!


Lay out one of each set and one each Purple 2-1/2" square D to form a corner square.


Sew the Lilac/Purple units to the left side of the Purple 2-1/2" square D.


Sew the Light Pink/Purple units to the right side of the Purple 2-1/2" square D.


Sew the top and bottom units in place for form a corner square.


Make four corner squares.  Each corner square should measure 4-1/2" square.


Step 4:  Lay out the entire block.  Be sure the Purple sides of the hourglass units are on the edges of the block.  Also be sure the Lilac points of the Corner Square units are in the block corners.


Sew the units into three rows.


Sew the rows together to complete the block.
Smile!


Here's an example of what it would look like if you put nine of these blocks together in a straight setting.  Note the interesting secondary pattern that appears.

Until next time...please visit the Curlicue Creations Shop...and have a super day!

Get Creative!

Jennifer Schifano Thomas